Grimdark Basing Tutorial: Building Bases (ft. Print Hub 3D)
.JPG)
Hi everyone! I've got lots of requests and comments surrounding my bases and how I construct them for my miniatures, so I thought I'd put together a step-by-step guide of how I make them. Print Hub 3d were kind enough to send me some parts from Epic Basing, Sacrumundus and Bestiarium for me to help populate these bases too, so check them out to get any of your basing materials printed that you may need.

To start, I like to gather all my materials; here we have: my box of rubble (which includes sand, thicker grit, bricks for model trains and debris from actual bricks); some flat terrain parts (in this case, a Skyshield landing pad, though textured plasticard or Necromunda flooring would suffice); Citadel skulls, other assorted terrain parts (in this case, what was printed for me by Print Hub 3D); and finally, some placticard tubes and bits of rebar.

For this tutorial, I'll be using some converted Ophydian Destroyers from the GW Necron range. I chose these models due to their large base size, which allows me to include lots of different parts, as well as the nice bits of scenery incorporated into the models. I build them fully, though I haven't filled any gaps yet.

I start the process by superglueing pieces of brick (I find these from crumbling walls in my area) down onto the bases, the flat side upwards to represent city streets, plateaus or rubble. I fit these against the base of the models, using Blu Tak to check if I like the look. I like these to overhang the bases a little, and to fill up around 50% or more of the surface area, but variety is key.

Next, I fill in some more of the empty spaces in the bases with cut off flat pieces from the Skyshield Landing Pad. I'm aware this is not a piece of terrain everyone has access to just cut up, so Necromunda floor tiles or textured plasticard work well here. With the foundations complete, I then superglue the miniatures down to their bases (in this case I do, anyway. Sometimes, if the models are finnicky enough, I'll paint them separately to the bases).

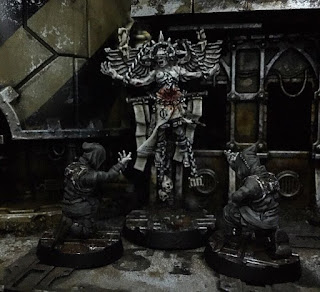
Next, I add sculpted terrain elements to the bases to give them a bit of legitimacy, such as pieces from plastic terrain or or from bespoke basing kits. In this instance, I've been using some Ruined Gothic Castle Scenery Elements and some city rubble, which was printed for me by Print Hub 3D. The parts are easy to use and cut up, have few visible print lines, and are razor sharp quality. They meet my aesthetic tastes perfectly.

Next, I add the plasticard elements to the bases, adding piping and girders under the flats of brick to create the illusion of broken concrete. To add to this, I apply 3-5 small bricks that I bought from a railroad shop to each base, filling in gaps.

I then fill in any remaining gaps with Milliput, smushing the putty between design elements to create a rugged look. I use this opportunity too to fill any gaps in the miniatures. I leave it overnight to cure.


I then put cheap, runny superglue over about 3/4 of the Milliput and any other gaps or untouched elements on the base and then sprinkle on my mixture of sand and grit. This allows for realistic diverse texture which can represent sand, rubble, dust, mud etc.

To add to these textures, and to create a thinner one, I use a toothpick and smudge on Stirland Mud from GW onto the remaining areas, as well as over some of the terrain parts at random.

Finally, I use a makeup spray bottle full of water and lightly spray the bases. This moves the Stirland Mud around and spreads the texture over much of the base, also locking in the sand. It also gives you a better look at what the base elements may look like once primed (as they're one united colour). I leave this, again, overnight to dry. And with this, the bases are ready to be painted!
Thank you for reading, everyone! This is a tutorial I'd wanted to put together for a while, as lots of people had asked for one, and I wanted to create an easier alternative to using literal concrete that some people do. A big thank you also goes out to Print Hub 3D for sending me the parts (and many others!) for my bases to review. Their 3D printing service provides excellent, sharp results; the quality is great, and they've been some of my favourite 3D prints so far. You can also check out their Instagram @printhub3deu

Comments
Post a Comment