Converting Brutalist Exterminators (ft. 3dgamesshop)

I've been fascinated with the more brutal side of Games Workshop's Space Marine factions for a while now--the Rogue Trader, stimmed-up authoritarian Frankenstein's Monster-esque interpretations of them, as opposed to the streamlined modern 40k versions. GW's return to Saturnine provided a blueprint for a return to these ideas to highlight the satirical nature of the setting, but they weren't quite brutal, nor brutalist, enough for my liking.
Enter: Sedivalle's Exterminator miniatures. These sculpts are much, much larger and more industrial-looking than Games Workshop's offerings, and perfect for converting into the Space Marines I have always dreamed of. I started the process as I always do--by making a Pinterest board and folder on my phone full of artwork and similar conversions and paintjobs to see what was possible within the space I wanted to explore.
As ideal as these miniatures were for the project I wanted to approach, I don't own a 3D printer, and as it seems to me like a whole other hobby in itself, it wasn't something I really wanted to get into. Serendipitously, 3dgamesshop (@3dgamesshopltd on Instagram) reached out and offered to print me some that I could review for you all on my Instagram page and on my blog. This was perfect for me, as I was genuinely already after these models anyway, so it was a really straightforward way of me getting my hands on the minis without having to commit to getting a printer.
And a few days later, they arrived. I took some pictures throughout my build so hopefully you can get an idea of the process around how I approach building my miniatures.

The miniatures are HUGE, much larger than I was expecting, and in the best way. The quality of the prints is superb; I can only compare them to higher end resin miniature kits, such as Forge World miniatures, but without any of the clean-up, warping or other issues that normally come with such quality. These guys didn't need a wash, and were ready to put together pretty much straight out the bags after some light sanding on the shoulder pads and tidying up a couple edges with my scalpel.

After building the main components of the models, I set about converting them to use as the more brutalist Space Marines in my games.

I used some resin Forgeworld heads I had lying around; while the ones provided to me are great and work perfectly for the original build, I wanted bare heads to showcase how unhinged these guys can be. I've never really liked Space Marines being handsome--as I said, I've interpreted them more as these monstrous creatures stitched together and remade a hundred times. They should look ugly and brutal. They were children when indoctrinated to fight in these metal coffins, and the psychological toll of that should show.
As they're bigger than the helmets supplied, I had to trim back the hatch above their heads so they wouldn't obscure their eyes. With my clippers, the resin cut easily and didn't fly off anywhere. I filled the gaps with some Milliput. I'm a very messy converter--measure once, cut twice sort of attitude, but the resin’s durability allowed me to be messy and not worry about screwing up the sculpts. My process, even when making models like these which I didn't cut up *too* much, is very iterative, chasing general vibes of what poses and impressions the models should inspire. Tilting a model by a few degrees and angling the head to make a new "golden angle" can go a long way in making models look not only unique, but also just more natural and fluid in their posing.

My next step when building models is to start sketching out the bases. I used GW floor parts and offcuts of brick walls for this, combining them onto the bases with Blu Tac and then supergluing them into place. I then moved around the models on top and played around with them a bunch until their centre of gravity is in the middle of the bases. This is honestly the most time-intensive part of any build for me. I'm a bit of a perfectionist when it comes to models having poses I want. Having sculpts I can come back to, tear off the bases, and reposition without damaging them is really important to my process.
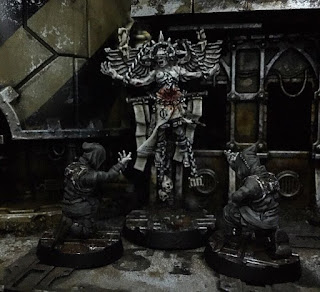
Once I built the bases and had the movement angles of the models sorted out, I added the claw arms and glued them down. I thought it would be fun to compare them to a true-scale human miniature (an OOP Forge World Krieg mini) to show off just how huge these guys are.

At some point in the process, I had the idea to give one of them a back banner and used my hand drill to make a 1mm in the top of the model. Though I eventually decided against this (like I said, messy converter), drilling into these prints was super smooth with no bits and pieces flying off or cracking. I just had to fill the hole with Milliput. I reckon I'll experiment with more back banners and old school ideas like this in the future. This is usually how my creative process of even minor conversions works out in all honesty--false starts and constant editing.

After filling the holes I made and finishing off the bases with some debris and texture paint, they're ready to paint.
A huge shout out must go to 3dgamesshop (who you can find here) for sending me these models for review. I can't recommend the quality of their prints enough, and for people like me who don't want a printer themselves, but want access to these miniatures still, their service is fantastic. As I said, I was already looking for these miniatures to paint, so I’m very grateful for their contribution to my hobby.
You can also find them on Instagram at @3dgamesshopltd
These miniatures were designed by @sedivalle on Instagram. They're amazing sculpts, and you can check out more of their work here.
Thanks for reading!
Comments
Post a Comment